✔ Competitive Pricing ✔ Quality Service ✔ Extensive Stock ✔ Experienced Staff
 Price
PriceFeeding the Material
A Guide to Feeding the Material When Routing
How to Choose the Correct Cutting Depth
To avoid overheating or snapping the cutter, it is important not to overload it by cutting too deep in a single pass. Determining the optimum depth is largely a matter of experience and depends on several factors such as cutter shank size, power of the router, hardness of the material being cut, and the router feed speed. As a rough guide the depth of cut should not exceed the diameter of the cutter when you are using cutters up to 1/2” diameter, or the diameter of the cutter shank, whichever is smaller.
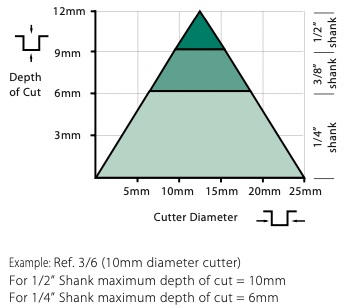
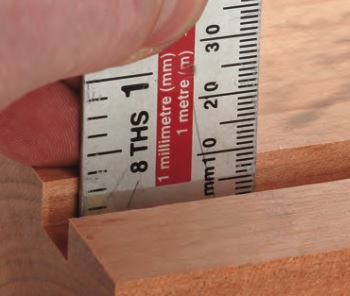
If any of the criteria cannot be met, take several shallower passes until the full depth of cut is reached. You will soon develop a feel for when the correct cutting depth is being used as factors such as noise, feed resistance and drop in router speed will indicate when a deep cut is attempted. Never force a cutter to rout too deep a cut in one pass, instead stop routing, re-adjust the cutting depth and try again. Check you have reached the required depth by making a trial cut in a piece of scrap material. It is more reliable than trying to measure the cutter projection from the base of the router.
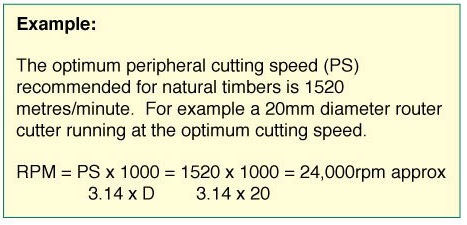
How to Choose the Correct Router Speed
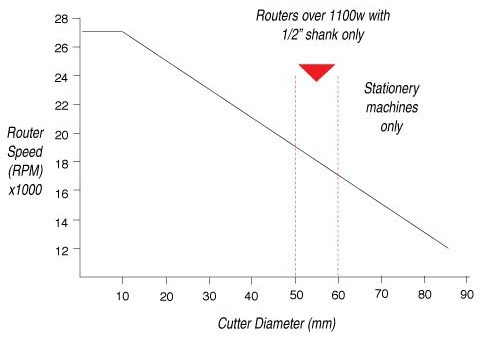
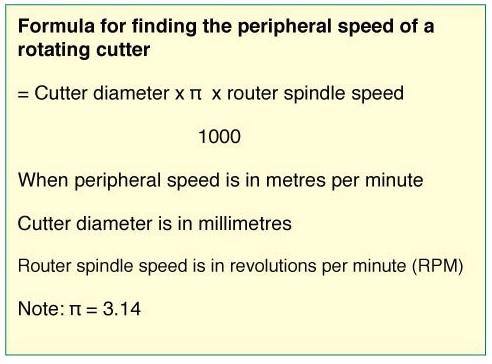
Separate variable speed controllers are available for connecting the router and the power source. However, these are unlikely to offer full-wave rectification or speed compensation and do not maintain the available power evenly throughout the speed range. Inferior types of speed controllers can also affect the smooth running of a router, particularly at lower speeds.
Feed Speed
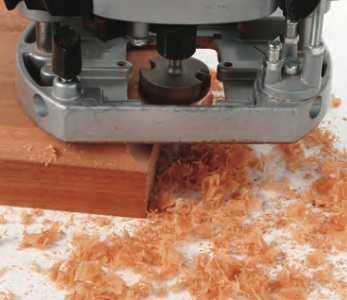
It is only with practice that you will get a feel for the proper feed rate. Close observation of both the type of waste you are producing and the resultant surface finish is a good guide as to whether you are feeding properly. If the bit is sharp you should be producing fine wispy shavings and leaving a clean, neatly severed finish on the work, particularly with natural timbers.
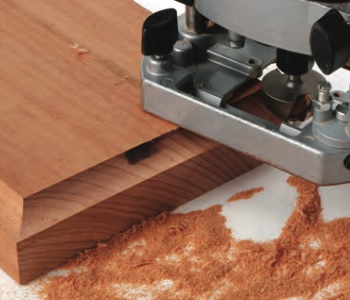
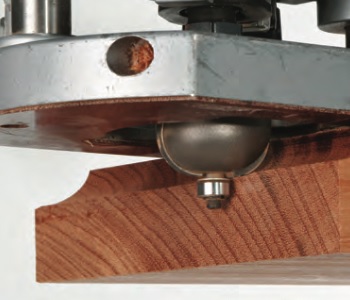
Most beginners tend to be overcautious and feed the tool far too slowly in the mistaken belief that the finish will be better. In fact, bits will stay cooler, keep sharp for longer and produce a better cut surface if you increase the feed rate moderately. The feed rate also needs to be one continuous operation at constant speed. Even the slightest hesitation in the speed of feeding will leave a scorch mark that is very difficult to remove with abrasives.
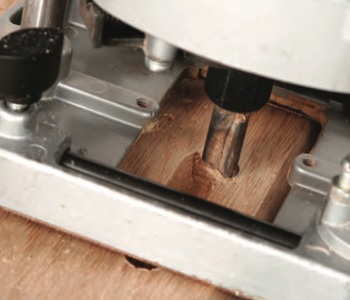
When you reach the end of the cut, always lift the router by releasing the plunge lock while the power is still on and then switch off when the bit is clear of the work. If you try and switch off while the cutter is still in the cut, it will burn, but more importantly, the slightest wobble will cause an even deeper mark and the slowing cutter may try to grab the work, kicking the cutter sideways. Similarly, you should always start the router with the cutter clear of the work and not in place in an existing cut. The starting torque will inevitably twist the router and cause the cutter to snatch.
Cutter Feed Direction
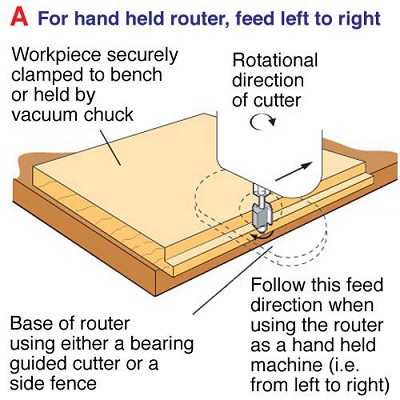
One of the most important rules of routing is feed direction. This refers to the direction in which the workpiece is fed across the face of the cutter, or the cutter across the workpiece in relation to the rotation of the cutter. The golden rule is that for all routing operations, the feed direction should oppose the rotational direction of the cutter. What is important to remember is that when the router is above the cutter, shank pointing upwards, the cutter is rotating clockwise when viewed from above (see image A). When the motor is beneath the cutter with the cutter shank pointing downwards, the rotational direction of the cutter is anti-clockwise when viewed from above.
Hand-Held Routing
When using the router as a handheld machine for edge rebating, planing or moulding, the rotational direction of the cutter is used to pull the cutter into the timber. This ensures that the fence is also pulled into the edge of the material. If fed in the opposite direction, the fence will tend to wander away from the edge leaving an irregular width moulding and making it more difficult to maintain a smooth and even feed speed. Also, there is the risk of the router running away from you creating a safety hazard.
Inverted Routing
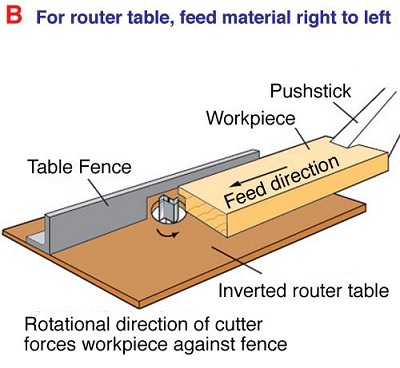
When routing on a table, that is with the router mounted beneath it, the feed direction is always from right to left (against the face of the fence). This ensures that the workpiece is pushed by the cutter against the table fence. If you attempt to feed from the opposite end, the workpiece will be pulled away from you. Not only will you not be able to machine the work successfully but you are likely to be set off balance, again setting up a safety hazard.
Overhead Routing
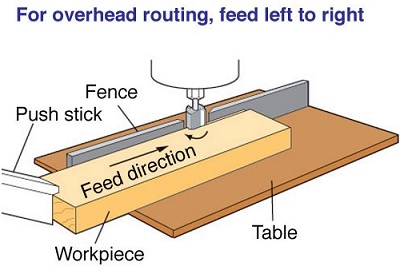
When using an overhead router, the feed direction should always be from left to right. Again the rotational direction of the cutter will pull the workpiece against the fence face. Feeding in the opposite direction will create an unsafe and unworkable situation as before.
There is a right and a wrong way to feed the router. With certain exceptions the golden rule is that the feed direction should always be against the direction of rotation of the cutter. This ensures that the cutter is pulled into the work and whatever is guiding it is then pressed against the edge of the work. This way, the cutter will not wander off line and you will have no problem controlling it.
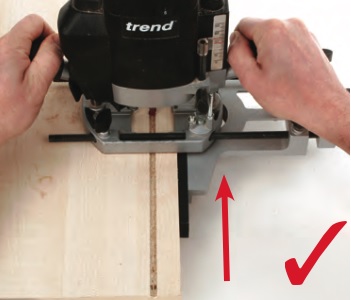
If you feed the wrong way, the fence or guide will try and veer off, the router may snatch and you will have great difficulty keeping it on line.
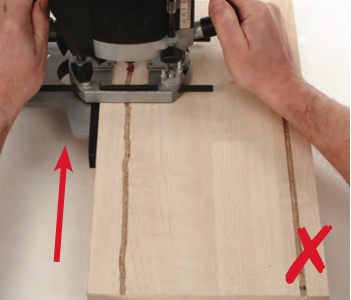
If you view your router from above, the cutter rotates clockwise and you need to feed against this, but the direction varies with the type of cut you are making.
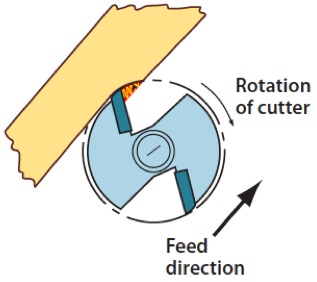
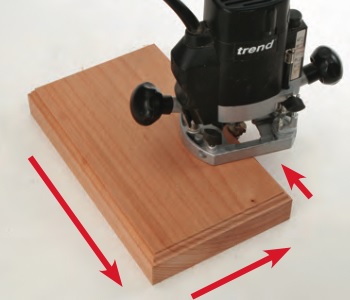
For edge moulding the router has to be fed from left to right. Similarly, if you are using a straightedge or fence as a guide for internal cuts, the feed direction should always remain against the direction of rotation of the cutter.
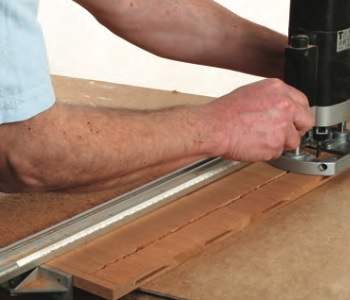
If you are moulding around the outside of a board, this means feeding the router anti-clockwise when viewed from above.
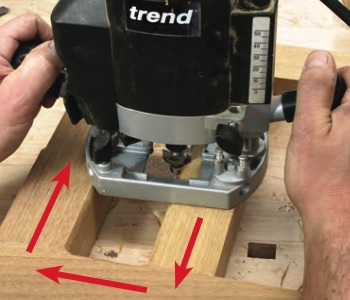
If you are working round the inside of an opening, then the router has to be fed clockwise.
Similarly, if you are using templates, external ones will require the router to be fed anti-clockwise.
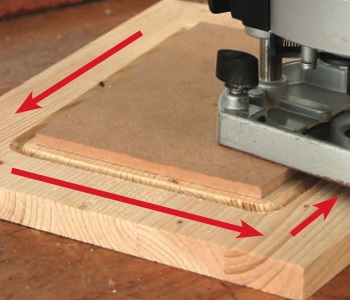
But internal ones need feeding clockwise.
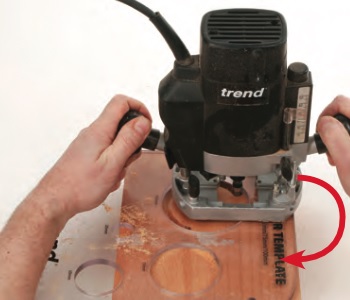
Cutting circles with a trammel is a similar situation, so the router must be fed anticlockwise to keep the cutter pulling out against the centre point of the trammel.
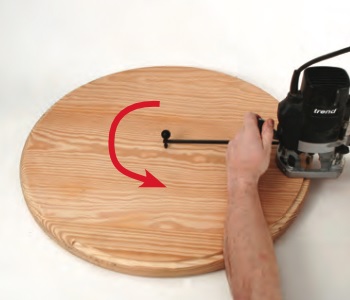
It doesn’t matter if you push or pull the router as long as it travels in the right direction. Some cuts like rebates are often easier to make if you pull the router towards you but although the set-up may look different, it is actually the same as far as the router is concerned.
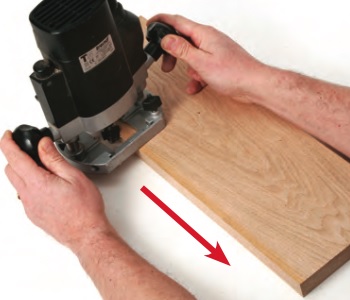
With solid timber, you also have to consider grain direction in conjunction with feed direction. As you make a cut across the grain it is likely that there will be some splintering or breakout as the cutter emerges from the edge.
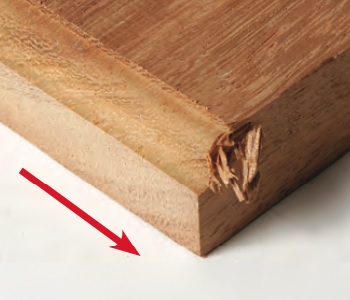
If you are routing all the way around the board, make the end grain cuts first and then the break-out should hopefully be cut away when the side grain is cut.
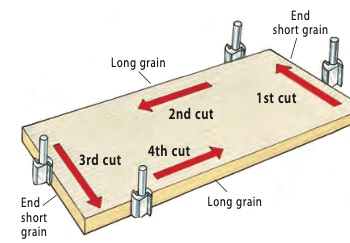
If you are only making end grain cuts, eliminate breakout by clamping on a sacrificial support strip and machining right through into it.
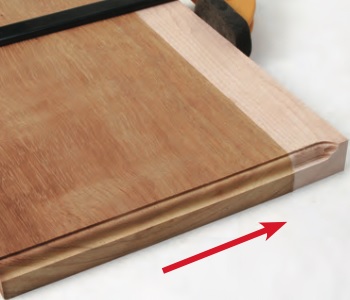
Alternatively, plunge the cutter down to full depth on the exit corner of the board before you make the cross cut.
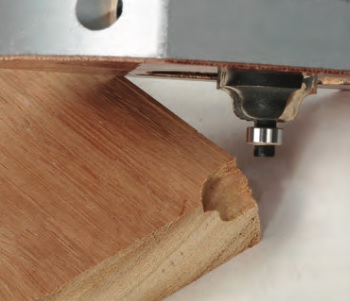
If you are routing freehand in the centre of a board, as for instance removing some of the ground from a carving, it doesn’t really matter which way you feed, but if you increase the cutting depth in progressive stages, then do keep working in the same direction.
Progressive Cuts
When using large moulding or panelling cutters, the full depth of cut must be reached in a series of shallow steps. Where the cutter features an open shape, each step can be made vertically, using the fine height adjuster to guide the cutter on each pass until the final depth is reached. The quality of the finish will be improved if the final cut is kept very light.
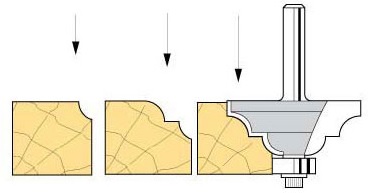
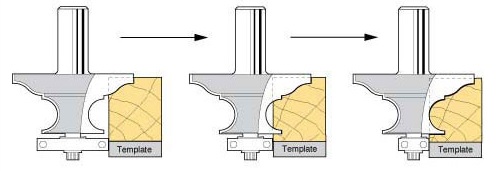
Where the cutter features a closed shape, increasing depths vertically is not possible. If a side fence or back fence (i.e. table fence) is used, then this can be adjusted using the fence to make incremental cuts. For both straight or curved work, ball-bearing guided cutters can have alternative diameter ball-bearings interchanged before each pass, effectively increasing the width of each pass. This is imperative if small intricate workpieces are to be moulded safely.
Backcutting
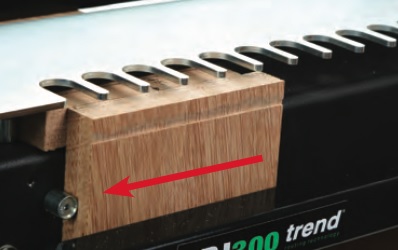
Once the fibres have all been scribed neatly, you can make the rest of the cut to full depth, feeding the router in the conventional way.
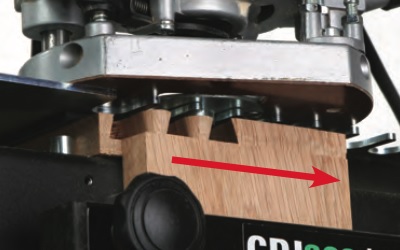
If you are edge moulding, some timbers may have diagonally orientated grain and there is then the possibility of it splitting out ahead of the cutter. This can be overcome by backcutting first before making the main cut. Or try making a couple of shallower passes by raising the cutter or fitting a bigger diameter bearing.
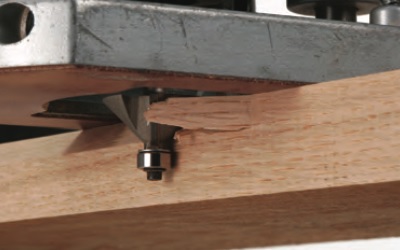
Circular work is another potential routing problem area as there are so many different grain surfaces exposed. You are bound to end up cutting against it somewhere. In this situation, you can make several successive, but very shallow passes cutting the ‘wrong’ way in the difficult areas.
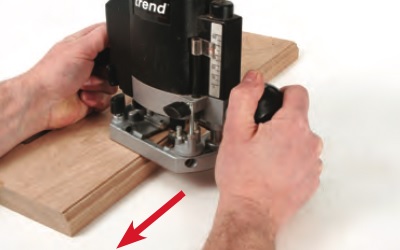
A straight forward edge mould can sometimes look ok, but in reality it feels as if the surface is covered with a series of tiny ripples. This can usually be cleaned up by firmly pulling the router backwards at the same setting as you have just used to make the initial cut. Theoretically, it shouldn’t remove any more timber, but the smoothing effect is often amazing.
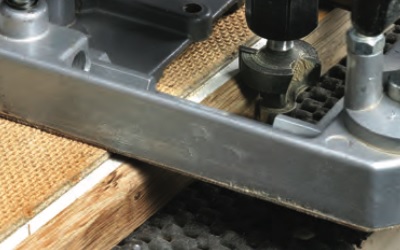
If you are trimming edge lippings flush to the face of a board, the feed direction has to be opposite to normal so that the lippings are pressed back against the edges, rather than prised off. Although backcutting will not damage the cutter, the fence or guide will try to wander away from the intended line and you need to be extra careful to stop it snatching.
We stock a wide range of high quality Routers from top brands such as Trend, Festool, Mafell, Metabo and more.


 01726 828 388


